ARUWPController Options in HoloLensARToolKit v0.1
14 Feb 2017This post is part of documentation of HoloLensARToolKit, version v0.1.
ARUWPController
ARUWPController.cs is one of the main scripts used in HoloLensARToolKit. In this post, the options of this script are listed and discussed, along with common usecases.
Each Unity project using HoloLensARToolKit package must and must only have one ARUWPController component.
ARUWPController is very similar to ARController in ARToolKit, one of the major difference is that ARUWPController targets only at Universal Windows Platform, while ARController also handles Android, iOS, standalone and even editor. Therefore, ARUWPController has fewer attributes than ARController in general.
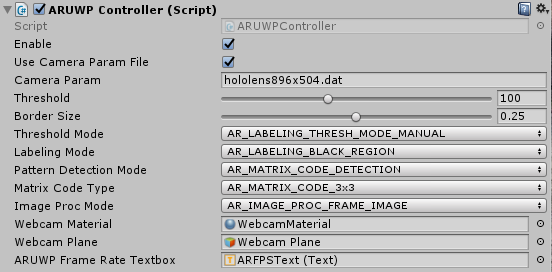
When ARUWPController script is attached to some Unity GameObject, its inspector window looks like this:
Camera Param
- The field camera param specifies the name of camera calibration file, contained in the path
Assets/StreamingAssets/. - The camera calibration file must be ARToolKit format. It is a binary file, instead of XML or YAML for OpenCV. Please refer to HoloLens Camera Calibration project for more details.
- If you have a bytes array containing the camera calibration information, please refer to function
ARUWPController::setCameraParamBuffer.
Threshold
ARToolKit first thresholds the grayscale image before corner extraction. If the Threshold Mode is set to AR_LABELING_THRESH_MODE_MANUAL, then this value is used as the threshold.
Border Size
The percentage of border of the marker, by default, it is 0.25. For example, in a 80cm width marker, the border is 20cm (25%).
Threshold Mode
You can choose different thresholding algorithm from the droplist, same as ARToolKit. Available options are:
AR_LABELING_THRESH_MODE_MANUALAR_LABELING_THRESH_MODE_AUTO_MEDIANAR_LABELING_THRESH_MODE_AUTO_OTSUAR_LABELING_THRESH_MODE_AUTO_ADAPTIVEAR_LABELING_THRESH_MODE_AUTO_BRACKETING
Labeling Mode
It configures the color of the border of the marker. AR_LABELING_BLACK_REGION is the default.
Pattern Detection Mode
This field configures what kind of marker does the detection algorithm look for.
- If pattern markers only, e.g. Hiro or Kanji, then
AR_TEMPLATE_MATCHING_COLORorAR_TEMPLATE_MATCHING_MONOis enough. - If matrix marker only, e.g. 3x3 code marker, then
AR_MATRIX_CODE_DETECTIONis sufficient. - If there is need to detect both kinds of marker, then
AR_TEMPLATE_MATCHING_COLOR_AND_MATRIXprAR_TEMPLATE_MATCHING_MONO_AND_MATRIXmust be chosen. Otherwise, one kind of marker is not detected.
Matrix Code Type
There are many kinds of matrix marker, some of them are supported by ARToolKit and this project. Most common one is AR_MATRIX_CODE_3x3. All available options are:
AR_MATRIX_CODE_3x3AR_MATRIX_CODE_3x3_PARITY65AR_MATRIX_CODE_3x3_HAMMING63AR_MATRIX_CODE_4x4AR_MATRIX_CODE_4x4_BCH_13_9_3AR_MATRIX_CODE_4x4_BCH_13_5_5
Image Proc Mode
The mode of image processing, by default, AR_IMAGE_PROC_FRAME_IMAGE is chosen.
According to ARToolKit documentation,
When the mode is
AR_IMAGE_PROC_FIELD_IMAGE, ARToolKit processes pixels in only every second pixel row and column. This is useful both for handling images from interlaced video sources (where alternate lines are assembled from alternate fields and thus have one field time-difference, resulting in a “comb” effect) such as Digital Video cameras.
Webcam Material
This is the Unity Material object that saves the frame data. This material can be attached to other objects as texture, or displayed in 2D mode as Unity::UI::Image.
Webcam Plane
This field is usually for debugging use. You can display the current frame on a Unity Plane object.
ARUWP Frame Rate Textbox
This field specifies the Unity::UI::Text object that ARUWPController outputs the current frame rate information. In the samples, it is a good indicator of the system runtime status. It can be visualized as a Head-Up Display (e.g. always in the top-right corner).
Finally
You can access more articles describing the implementation details of HoloLensARToolKit in my blog, simply clicking on the tag:
Thanks for reading!